Run your first job
Authentication
Section titled “Authentication”As mentioned in the Pasqal Tools overview you will use PasqalCloudConnection to send a job to Pasqal’s hardware.
The pasqal-cloud package can be installed using pip with
pip install pasqal-cloudThe package main component is a Python object called PasqalCloudConnection which can be used to submit jobs for execution.
You can send one or several jobs for execution to Pasqal’s cloud using:
- the email and password combination you used to sign-up
- the ID of the project you are a member of
Import PasqalCloudConnection and initialize it with your credentials, as shown below. You will be automatically prompted to enter your password.
from pasqal_cloud import PasqalCloudConnection
project_id = "your_project_id"  # Replace this value by your project_id on the Pasqal platform.username = "your_username"      # Replace this value by your username or email on the Pasqal platform.
# Initialize the connectionconnection = PasqalCloudConnection(username=username, project_id=project_id)
from pasqal_cloud import PasqalCloudConnection
project_id = "your_project_id" # Replace this value by your project_id on the Pasqal platform.username = "your_username" # Replace this value by your username or email on the Pasqal platform.
# Initialize the connectionconnection = PasqalCloudConnection(username=username, project_id=project_id, region="sa")Create a Batch of Jobs
Section titled “Create a Batch of Jobs”Create a Sequence
Section titled “Create a Sequence”A batch is a group of jobs with the same sequence that will run on the same backend. See the Advanced Usage section to learn more about how to use batches to optimize the scheduling of your jobs.
A sequence is the central object in Pulser and it consists essentially of a series of pulses. A sequence can be “parametrized” if you define variables inside it.
See the page Understand your sequence for more information on the sequence object.
Let’s see an example of the creation of a simple sequence with a single variable and its serialization to a string:
from pulser import Pulse, Register, Sequencefrom pulser.devices import DigitalAnalogDevice
# Define a register for your sequenceregister = Register.square(2, spacing=5, prefix="q")# Create a sequence for that registersequence = Sequence(register, DigitalAnalogDevice)# Add a channel to your sequencesequence.declare_channel("rydberg", "rydberg_global")# Declare a variableomega_max = sequence.declare_variable("omega_max")# Add a pulse to that channel with the amplitude omega_maxgeneric_pulse = Pulse.ConstantPulse(100, omega_max, 2, 0.0)sequence.add(generic_pulse, "rydberg")Send your first batch with the PasqalCloudConnection through the Cloud
Section titled “Send your first batch with the PasqalCloudConnection through the Cloud”Now that we are authenticated the connection and we have created a sequence, let’s send a batch of jobs for execution on one of our emulators.
To create a job, you need to define:
- a number of runs. This sets the number of time the sequence will be run on the backend and the final state measured.
- a value for each variable of the sequence, if any.
We are now ready to create our first batch with the PasqalCloudConnection:
from pasqal_cloud import PasqalCloudConnection, RemoteEmuFreeBackend
project_id = "your_project_id"  # Replace this value by your project_id on the Pasqal platform.username = "your_username"      # Replace this value by your username or email on the Pasqal platform.
# Initialize the connection# This will open a prompt to enter your passwordconnection = PasqalCloudConnection(username=username, project_id=project_id)
# When creating a job, select a number of runs and set the desired values for the variables# defined in the sequencejob1 = {"runs": 20, "variables": {"omega_max": 6}}job2 = {"runs": 50, "variables": {"omega_max": 10.5}}
# Send your batch on an emulator using a RemoteEmulatorBackend# For a basic single-threaded QPU emulator that can go up to 12 qubits, you can use RemoteEmuFreeBackendbackend = RemoteEmuFreeBackend(sequence=sequence, connection=connection)
results = backend.run(job_params=[job1, job2], wait=True)
# Once the backend has returned the results, you can access them with the following:for job_id, result in results.get_available_results().items():    print(f"job-id: {job_id}, result: {result}")
from pasqal_cloud import PasqalCloudConnection, RemoteEmuFreeBackend
project_id = "your_project_id" # Replace this value by your project_id on the Pasqal platform.username = "your_username" # Replace this value by your username or email on the Pasqal platform.
# Initialize the connection# This will open a prompt to enter your passwordconnection = PasqalCloudConnection(username=username, project_id=project_id, region="sa")
# When creating a job, select a number of runs and set the desired values for the variables# defined in the sequencejob1 = {"runs": 20, "variables": {"omega_max": 6}}job2 = {"runs": 50, "variables": {"omega_max": 10.5}}
# Send your batch on an emulator using a RemoteEmulatorBackend# For a basic single-threaded QPU emulator that can go up to 12 qubits, you can use RemoteEmuFreeBackendbackend = RemoteEmuFreeBackend(sequence=sequence, connection=connection)
results = backend.run(job_params=[job1, job2], wait=True)
# Once the backend has returned the results, you can access them with the following:for job_id, result in results.get_available_results().items(): print(f"job-id: {job_id}, result: {result}")Once your script exits successfully, you can follow the status of your batch and its jobs during their life-cycle, cancel them or download their results directly in the User portal (external) .
Congrats! You just ran your first job on one of our backends (Emulators) through Pasqal’s Cloud platform 😃.
Understand job results
Section titled “Understand job results”Once your jobs have been executed, each result includes key information to help you analyze the output.
Accessing results
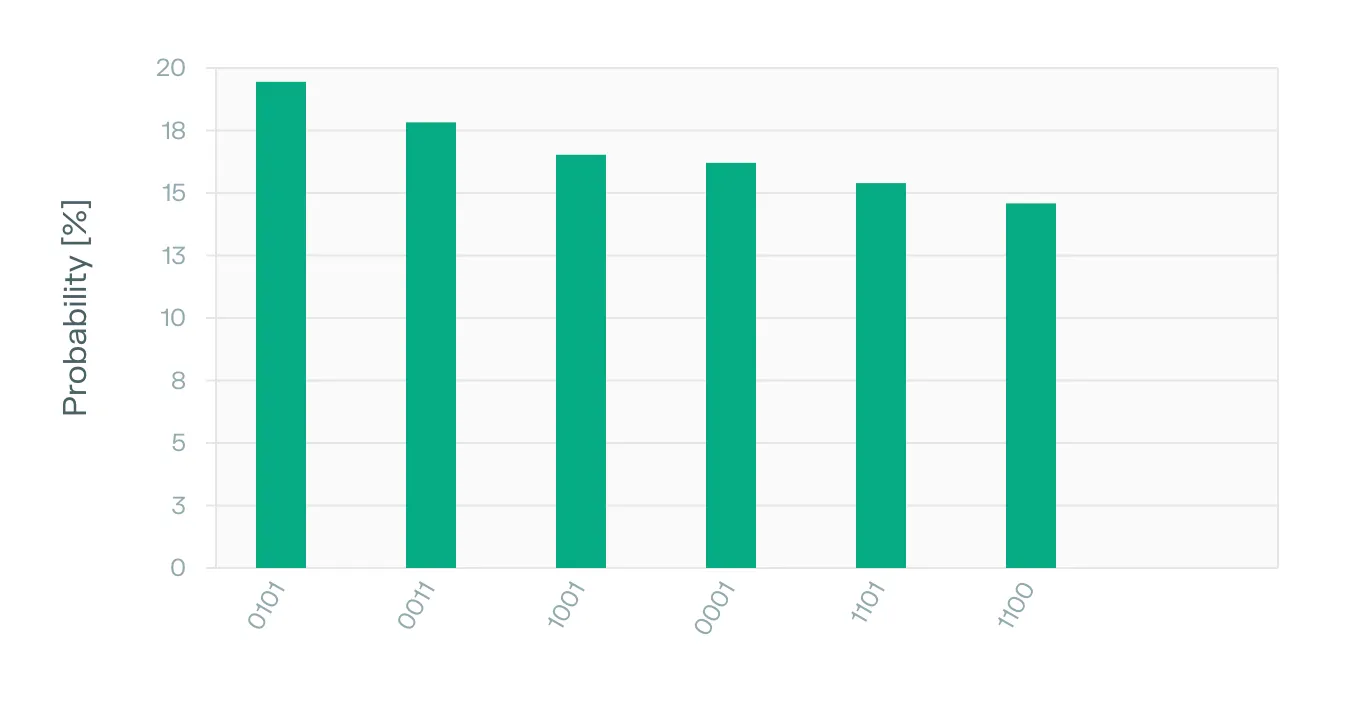
Section titled “Accessing results”This is an output example of printed results, more detail can be found in dedicated Results pulser documentation.
print(result.final_bitstrings){"0001": 100, "0101": 120, "1100": 90, "0011": 110, "1101": 95, "1001": 102}View results in the Portal
Section titled “View results in the Portal”You can inspect results directly in the User portal (external) :
- Navigate to your batch then job
- Check bitstring outputs and shot count by using the built-in histogram view